“SIP Profile Configuration”的版本间的差异
| (未显示同一用户的1个中间版本) | |||
| 第6行: | 第6行: | ||
SIP profile 包含了SIP UA 配置。 | SIP profile 包含了SIP UA 配置。 | ||
| − | Sangoma SBC | + | Sangoma SBC 可以配置为一个多 UA 帐号,每个UA 有不同的配置(因此,需要不同的IP:端口组合)。 |
| − | SIP Profile | + | SIP Profile 描述的信息是相对于SBC的本地信息。 |
| − | + | 远端用户代理信息用来连接Sangoma SBC。 | |
| − | + | *本地监听端口 | |
| − | + | *本地验证用户信息 | |
| − | + | *本地传输信息: TCP,UDP etc.. | |
;;;SIP Profile Configuration | ;;;SIP Profile Configuration | ||
| − | + | 用户可以创建一个SIP profiles,点击菜单“Configuration -> Signaling -> SIP Profiles”。 | |
http://manula.r.sizr.io/large/user/1885/img/nsc-sip-profile-add.png | http://manula.r.sizr.io/large/user/1885/img/nsc-sip-profile-add.png | ||
| − | |||
| − | + | 使用有含义的SIP profile 名称,无空格,例如“internal”, “internal-network”, “external-users”等等。 | |
| − | + | 记住SIP profile 是一个 SIP UA ,它用来和其他的SIP UA(例如 SIP phones) 或者 服务器 (ITSP, SIP Proxies )来进行通信。 | |
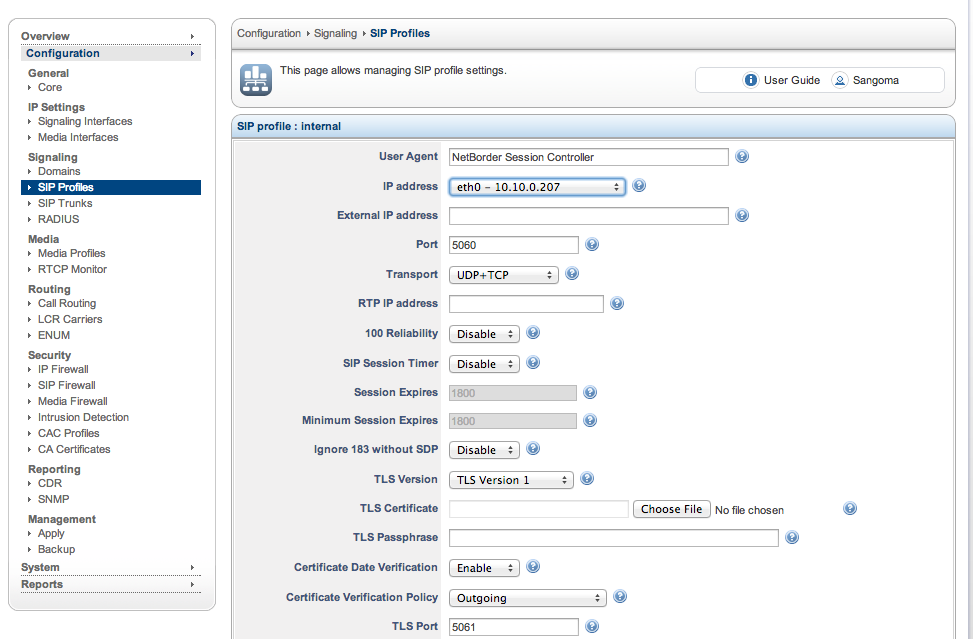
| − | + | 一旦点击了“Create”,用户会看到一个配置界面来创建新的SIP profile,在这个配置文件中,用户可以设置: | |
| − | + | *所有SIP profile信息 | |
| − | + | *包括IP信息 | |
| − | TLS/SRTP | + | *TLS/SRTP 设置等等。 |
| − | + | 需要特别注意以下内容: | |
| − | SIP Profile | + | SIP Profile |
| − | IP | + | *IP Address,设备监听的地址 |
| − | + | *Transport,传输方式,大部分的部署方式是默认的“UDP+TCP”,表示系统将通过UDP和TCP协议来接收SIP 数据包。 | |
| − | + | *Port,使用的端口,大部分情况下使用的是默认的5060端口。 | |
| − | Authenticate | + | *Authenticate Calls,表示接受任何SIP 呼叫 (INVITE requests) and not challenged. |
| − | Routing Plan: | + | *Routing Plan: 用户选择一个创建好的 routing plan。 |
| − | ! | + | ! 安全提示: 如果在SBC中关闭 Authenticate Calls,需要注意远端的SIP UA, 例如: IP IPBX 可能开启了 authetication enabled 功能。 |
| − | ! | + | ! 安全提示: 如果用户对公网暴露了SIP Profile, 用户可能需要修改端口号,而不是默认的5060,这样可以降低外部的攻击。 |
| − | + | ||
| + | 获得网络扫描的工具可以扫描5060端口,然后连接到SIP 服务器。虽然Sangoma SBC支持了多种防御的机制来检测扫描,还是建议用户使用不同的端口。 | ||
http://manula.s3.amazonaws.com/user/1885/img/nsc-sip-profile-edit1.png | http://manula.s3.amazonaws.com/user/1885/img/nsc-sip-profile-edit1.png | ||
| − | + | 界面的文本提示会帮助用户了解SIP profile 中每个配置选项的具体含义,希望用户认真阅读。 | |
| − | + | 当完成配置以后,点击“Save”保存配置。 | |
| − | + | 用户可以继续绑定一个或者多个domains到这个SIP profile。 | |
| − | + | 当绑定一个domain到这个SIP profile时,用户事实上已经为这个SIP profile追加了用户目录的用户信息。这个SIP profile 接受注册或者用户验证的SIP INVITE 消息,当然必须配合相应的用户名称和密码来验证,这些用户帐户信息是保存在 domain user directory (或者执行一个转发验证到domain 配置文件)。 | |
| − | + | 注意,为了支持 SIP authentication,用户必须开启“Authenticate Calls” 参数为“Enable”。 | |
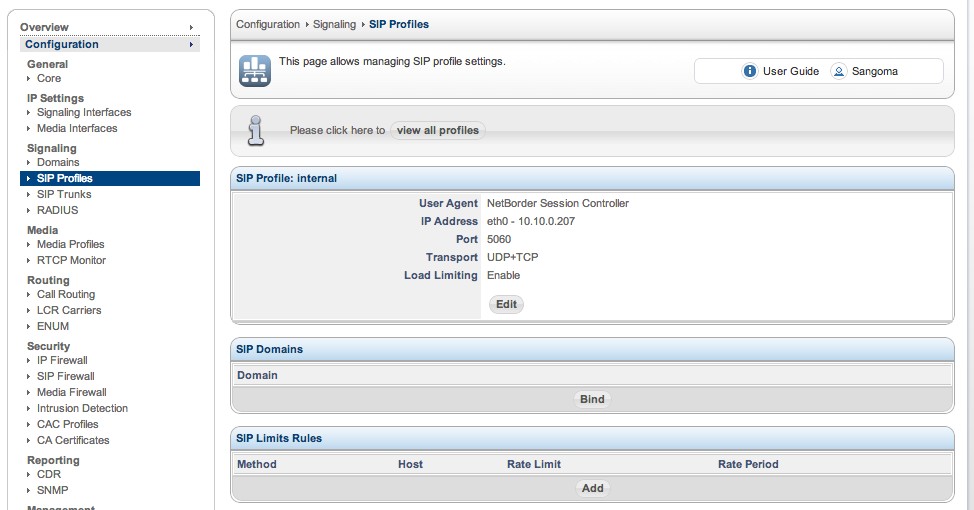
| − | + | 绑定 domain 和SIP profile, 在SIP profile修改页面中点击“Bind”: | |
http://manula.s3.amazonaws.com/user/1885/img/nsc-sip-profile-modify1.png | http://manula.s3.amazonaws.com/user/1885/img/nsc-sip-profile-modify1.png | ||
| − | |||
| − | + | 选择需要绑定的domains 来进行绑定。 | |
http://manula.r.sizr.io/large/user/1885/img/nsc-sip-profile-bind-domain1.png | http://manula.r.sizr.io/large/user/1885/img/nsc-sip-profile-bind-domain1.png | ||
| − | |||
| − | + | 最后点击“Bind”。用户会看到SIP profile页面的 domain 列表。 | |
2016年1月22日 (五) 15:15的最新版本
- SIP Profile Overview
SIP Profile 是一个SBC的帐号,包含了一系列的SIP配置属性和SBC本身关联。 SIP profile 用来配置如何支持外部的终端连接到SBC设备。 用户绑定一个IP地址,端口和其他相关的功能设置。 用户也同样绑定了call routes, domain profiles, media profiles, 和 SIP trunks,并且关联到SIP profiles。
SIP profile 包含了SIP UA 配置。 Sangoma SBC 可以配置为一个多 UA 帐号,每个UA 有不同的配置(因此,需要不同的IP:端口组合)。
SIP Profile 描述的信息是相对于SBC的本地信息。 远端用户代理信息用来连接Sangoma SBC。
- 本地监听端口
- 本地验证用户信息
- 本地传输信息: TCP,UDP etc..
- SIP Profile Configuration
用户可以创建一个SIP profiles,点击菜单“Configuration -> Signaling -> SIP Profiles”。

使用有含义的SIP profile 名称,无空格,例如“internal”, “internal-network”, “external-users”等等。
记住SIP profile 是一个 SIP UA ,它用来和其他的SIP UA(例如 SIP phones) 或者 服务器 (ITSP, SIP Proxies )来进行通信。
一旦点击了“Create”,用户会看到一个配置界面来创建新的SIP profile,在这个配置文件中,用户可以设置:
- 所有SIP profile信息
- 包括IP信息
- TLS/SRTP 设置等等。
需要特别注意以下内容:
SIP Profile
- IP Address,设备监听的地址
- Transport,传输方式,大部分的部署方式是默认的“UDP+TCP”,表示系统将通过UDP和TCP协议来接收SIP 数据包。
- Port,使用的端口,大部分情况下使用的是默认的5060端口。
- Authenticate Calls,表示接受任何SIP 呼叫 (INVITE requests) and not challenged.
- Routing Plan: 用户选择一个创建好的 routing plan。
! 安全提示: 如果在SBC中关闭 Authenticate Calls,需要注意远端的SIP UA, 例如: IP IPBX 可能开启了 authetication enabled 功能。
! 安全提示: 如果用户对公网暴露了SIP Profile, 用户可能需要修改端口号,而不是默认的5060,这样可以降低外部的攻击。
获得网络扫描的工具可以扫描5060端口,然后连接到SIP 服务器。虽然Sangoma SBC支持了多种防御的机制来检测扫描,还是建议用户使用不同的端口。

界面的文本提示会帮助用户了解SIP profile 中每个配置选项的具体含义,希望用户认真阅读。
当完成配置以后,点击“Save”保存配置。
用户可以继续绑定一个或者多个domains到这个SIP profile。 当绑定一个domain到这个SIP profile时,用户事实上已经为这个SIP profile追加了用户目录的用户信息。这个SIP profile 接受注册或者用户验证的SIP INVITE 消息,当然必须配合相应的用户名称和密码来验证,这些用户帐户信息是保存在 domain user directory (或者执行一个转发验证到domain 配置文件)。
注意,为了支持 SIP authentication,用户必须开启“Authenticate Calls” 参数为“Enable”。
绑定 domain 和SIP profile, 在SIP profile修改页面中点击“Bind”:

选择需要绑定的domains 来进行绑定。

最后点击“Bind”。用户会看到SIP profile页面的 domain 列表。